Thursday, January 12, 2012

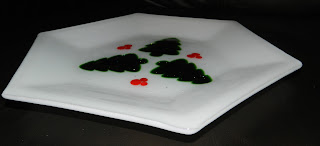
Holiday Plate


 So, I just completed a simple holiday plate. I wanted to try out the Spectrum CutUps™ and got some adventurine green Christmas trees. I layered iridized cream glass, clear glass and then the trees, and some red beads for a holly look and did a full fuse.

Then I slumped it in my hexagonal plate mold. First time use, hehehe!

Simple project, but I hope it puts a smile on someones face. Next time around I think I need to add a little decoration around the edges.


Friday, December 23, 2011

Concentric Bowl

 Creating a concentric bowl is a challenge. One I have to play with to master. You can see from the bottom picture the when I was trying to remove the inner circle, a crack formed to the outer edge. I've got some ideas on how to work around this.

First, I could sacrifice the glass at the center and possibly make a number of cuts through the middle, hoping to get enough play to release it. Second, I could drill a small hole in the center before making my cut and try to score to that.
Third, I could cut 2 distinct half circles for the outer edge, thereby having a consistent cut, but the lines will still be visible in the final piece. I believe that the  project will look even better when there is not a visible line in the edge piece, so I will aim for that in future pieces.

The other challenge to the plate was the inner circle. I cut it the same diameter as the inner piece. This require a bit more grinding than I would have liked to done and left some small gaps. They can't be seen now, but in the future, I will slightly shrink the inner circle next time.

Sunday, November 13, 2011

Basket weave plate


 I'm trying my hand at a basket weave. This one is a simple layer on layer with spaces in between built in. I've tried .5 inch strips with .5 inch chips to fill in between on the ends. To make it work out, the end chips are .25 by .5 inch, all other chips are square.

I can't wait to see how this one turns out.

UPDATE: It turned out wonderfully! nice round circles inside with negative space. This is a very cool project that I'm sure I will need to do again and again.

Tuesday, November 1, 2011

Layered Pattern Final

The layered plate is finished, for now. I am not happy with the edge on one side of the plate. If you noticed from the previous post there was some hangover that I should have trimmed before fusing. Call it laziness, call it low blood sugar, but in the end I had to do something about that edge. So I ground away the part that I didn't want and then slumped it. I figured that it would also fire polish my grinding away. Well it did, to a certain extent, but not enough for my taste. It was glossy but not rounded. My mistake was that to properly fire polish. it should be done while flat and at much higher temperatures than a slump.So next time around it is full fuse, cold working (if needed), fire polishing (if needed), then slumping. I am going to ask at my local store about doing a fire polish and then re-slumping. My fear is that re-slumping it will have it deform. I will post an update with a final decision, once I know.

I hope you like the plate, I know I do, even with the lessons learned. Remember everything is an experiment.

Sunday, October 30, 2011

layered pattern

 I am attempting to do a layered pattern here as an experiment.  I can see during my assembly that I'm a little bit off from a perfect cut. For now I'm going to do a full fuse and then trim , if needed. I ended up justifying 3 sides, so I will only have to trim 1 side, if at all.

In a geometric project I usually use my Morton cutting system. Today I noticed a bit of give in some areas which made my cuts not as accurate as they should be. So I am considering trying s new system that I've seen around called Beetle bits.
I like the integrated angle edge and the cutter add on. I'll have to let this gel for a while to see if I want to invest in it. I have so many other things I'd like to buy, like a better scroll saw and a glass saw that I can cut glass bricks with.

Can't wait to see how this turns out.

Saturday, August 27, 2011

Simple Bowl


We are going to a house warming party tomorrow. I figured ,what better to give the new house owners than a fused bowl. So I went out and bought a new bowl mold and a circle cutter, both of which I'd been wanting to get but hadn't invested in yet. Found some spectrum 96 glass I liked and fused some clear on top and slumped it into my new mold.

I'm not bothering to include instructions from this point on, unless it is complicated or uses an unusual firing schedule.
I hope they enjoy this!

Saturday, July 2, 2011

Shhh, It's a beach panel!! completed project.

This has been a top secret project!! Well, no one would have been harmed if it had leaked out, but it was for a gift that might have spoiled a surprise.

My wife and I worked on this panel together from concept to fruition. I was concerned the whole time that we were trying techniques we'd never tried and yet had a time line and no time to experiment. We could not mess this up!!!

So my record keeping has suffered, due to our time lines and doing some things on the fly, but this is the general way we did this panel. First, I did a full fuse of the sky blue that had some nice subtle coloring differences in it. Then I cut the palm trees out and we arranged them and laid down multi-colored blue frits and we did a contour fuse. I did it slightly less time and temp than the spectrum schedule. then we laid down our sandy frits and some more of the blue water frit and cloud white frit and did a tack fuse.
 We did not like the way the sand came out, too many dark spots. So then we placed some more of the sandy colored frit on and did another tack fuse.

In between each of these firings I ground down the panel side to be able to fit the stand that we purchased.


Lessons learned form this project. When doing frit on the edge of a panel use some type of dam so that we do not have to try to ground off so much fused frit. Keep better records!! even on time pressure items. Wash cut pieces better! You may not be able to see it, but the leaves have some black lines around the edges that were there for cutting, but I failed to wash off completely. Luckily, in this application, they look nice and add something to the piece. File that one under happy accident.